Lab 1: Unix, SSH, and Vim
Welcome to the first CSE 29 lab!
I’m your lab for this course, here to provide you with the time and space to explore practical software tools, including Unix commands, Git, GDB, Valgrind, Makefiles, and shell scripting.
You are not expected to know any of these topics yet—this is just a preview of what’s to come. Over the next 10 weeks, I will guide you as you build familiarity with these tools, which you’ll use throughout this course and in future endeavors.
I hope you enjoy the process and have some fun along the way!
- In each lab session, you will follow this guide to get firsthand experience with the tools and techniques we have introduced to you in lectures and discussions. This experience will be essential to your PA work. You earn credit for participation by being engaged with the content of this lab and interacting with the staff when asked.
These labs are a low-stakes environment to get proficient with programming and software tools with support from fellow classmates and course staff. Please ask for help from course staff if you are stuck on something—we are here for you!
Lab 1 Learning Objectives
- Connect to
ieng6using SSH (Secure SHell) - Try out and understand some essential Unix/Linux commands
- Write a basic C program on
ieng6using Vim - Compile and run the C program you wrote
Table of contents
- Icebreaker
- Let’s connect to
ieng6 - The Terminal and You
- Who are you? – Whiteboard Activity
- Who are we anyways? – Whiteboard Activity
- The Vim Text Editor
- Compiling and running your program
Icebreaker
-
Discuss the following with the people around you. Get to know your fellow group members!
- How you’d like people to refer to you (pronounce your name/nickname, pronouns like he/her/they, etc)
- Your major
- One of:
- A UCSD student organization you’re a member of or interested in
- Your favorite place you’ve found on campus so far
- A useful campus shortcut or trick you know
- What is your favorite movie, or (if you prefer) the last movie you saw? What genre is it?
- Who is your favorite character and why?
- What is your favorite thing about the movie?
Throughout this lab, we strongly encourage you to help each other. The staff is always there to help, but do try working together and helping each other out first.
Let’s connect to ieng6
First, open up a terminal window by following the instructions for your operating system.
- Windows: Do you have (Windows Subsystem for Linux) installed? (if you aren’t sure, assume you do not)
- No WSL: Press the Windows button, type in “Terminal”, then select “Terminal” or “Command Prompt” (if “Terminal” doesn’t exist).
- Once the window launches, type
sshand press Enter. If you see a red error message stating thatsshis not recognized, please follow the instructions here to enable SSH. - We do recommend installing wsl as it is a very useful tool! Let us know if you run into any issues on EdStem, in tutor hours, or in office hours.
- Once the window launches, type
- Yes, WSL is installed: Press the Windows button, type in “wsl”, then select “WSL”
- No WSL: Press the Windows button, type in “Terminal”, then select “Terminal” or “Command Prompt” (if “Terminal” doesn’t exist).
- MacOS: Click the Launchpad icon in the Dock, type in “Terminal”, then select the Terminal application.
- Linux: Press Ctrl+Alt+T to launch a terminal window.
As a student, you are assigned an account on the ieng6 server hosted by UCSD. These are similar to accounts you might get on other systems at other institutions (or a future job). We’ll see how to use your machine to connect to a remote computer over the Internet to do work there.
Your account name is the same account name as the one that’s used for your school Google account, i.e. it is the string that precedes “@ucsd.edu” in your school email address. In case you need to check the status of your student account, refer to the UCSD Student Account Lookup page.
Let’s use SSH (Secure SHell) to connect to ieng6 . Your command will look like this, but with the aname replaced by your account name. Don’t copy the $!
$ ssh Your account name@ieng6.ucsd.edu
The $ symbol is the prompt. In the terminal, it represents that you can type commands after this symbol to execute them. It is conventional to include $ when giving examples of commands to make it clear that they are user-written commands, as opposed to output from a command.
Since this is likely the first time you’ve connected to this server, you will probably get a message like this:
$ ssh aname@ieng6.ucsd.edu
The authenticity of host 'ieng6.ucsd.edu (128.54.70.236)' can't be established.
ED25519 key fingerprint is SHA256:8vAtB6KpnYXm5dYczS0M9sotRVhvD55GYz8EjN1DYgs.
This host key is known by the following other names/addresses:
    C:\Users\etomson/.ssh/known_hosts:1: ieng6.ucsd.edu
Are you sure you want to continue connecting (yes/no/[fingerprint])?
answer with: yes and it should say:
Warning: Permanently added 'ieng6.ucsd.edu' (ED25519) to the list of known hosts.
After this, you get a prompt to enter your password. This is the same password you use to log into your student account on other websites, like Canvas and Tritonlink. The terminal itself does not show what you type when you enter your password. This is conventionally done for your own security, so that others looking at your screen don’t see it. Just trust that it gets inputted when you type. Press Enter when you are done.
If the login process succeeds, you should see something like:
Last login: Tue Jan  7 10:00:00 2025 from 66.11.22.33
Hello aname, you are currently logged into ieng6-999.ucsd.edu

You are using 0% CPU on this system

To see all available software packages, type "prep -l" at the command prompt, or "prep -h" for more options.
[aname@ieng6-999]:~:45$
Now your terminal is connected to a computer that is physically somewhere else on campus, and any commands you run will run on that computer! We call your computer the client and the computer that is elsewhere the server based on how you are connected.
I sent one of your staff members on a mission to inquire about the origin of the name ieng6. The following was provided by the Office of Engineering Computing:
“ieng6 is a load-balanced multiprocessor Linux server that is maintained by ITS. This hostname originated decades ago, and unfortunately, we do not know why it was named ieng6. It may not even stand for anything.”
While the history of the name remains a mystery (at least for the time being), we did learn something interesting about what it is. Many people can use ieng6 at the same time.
Being a “multiprocessor” system means each machine(201, 202, 203 …) has multiple CPUs (or cores), so it can run many tasks at the same time.
Being “load balanced” means that when people connect to ieng6, they are distributed across multiple machines behind the scenes so no single machine becomes overloaded with work. When you SSH into ieng6 you are placed on a specific machine (such as ieng6-201, ieng6-202 or ieng6-203) which you can see in your prompt. Which one are you on? Is it the same as the people around you?
“Linux” is the operating system it runs. Other operating systems you may be familiar with include Windows and macOS.
If, in this process, you run into errors and can’t figure out how to proceed, ask! Remember – it is rare for a tutorial to work perfectly. We often have to stop, think, guess, Google search, ask someone, etc. in order to get things to work the way the tutorial says.
To exit out of the ieng6 server and return to running commands on your local device, type exit as a command, or press Ctrl+D (which sends an EOF character). Please exit the ieng6 server now for the next section.
The Terminal and You
In your day-to-day life as a CSE 29 student (and as a software engineer), you’ll be making heavy use of the terminal. Best to get familiar with it early on.
A terminal is a text-based interface for a user to interact with the computer. There are various commands that a user can type into the terminal that perform different functions. Let’s take a look at some of them.
pwd - “Where am I?”
The location in the file system in which you are currently is called the “working directory”. You can use the pwd command to print the name of the working directory.
$ pwd
/home/linux/ieng6/oce/6k/aname
uname - “Who am I?”
Unix name will give you nformation about the unix or linux system you are currently on.
$ uname
Linux
This alone does not tell us much but there are several flags that are useful.
-a:print all information, except omit -p and -i if unknown-s: print the kernel name (this is the same as defaultuname)-n: print the network node hostname i.e. the name of the computer.
systeminfo - Who am I on windows?
As uname stands for unix name, it does not tend to work on Windows machines. Thankfully, windows has provided it’s own command to print information about the system – systeminfo.
$ systeminfo

Host Name:                     ELENA-M15
OS Name:                       Microsoft Windows 11 Pro
OS Version:                    10.0.26200 N/A Build 26200
(...)
It gives far more information than you would need for this lab, but do note that it includes the name of the computer equivalent to uname -n.
ls - Looking around
You can’t do much without knowing what exists in the current working directory to interact with. You can use the ls command to list out the contents of the current working directory.
$ ls
folder hello.txt
Most commands will have multiple pre-defined options which allow you to modify the behavior of a command. Options are usually written as a dash (-) followed by a few letters. Some common options for the ls command include:
-a: list all files, including hidden files-l: list in a long format, which shows additional information, such as permissions and time of creation-al: enables both the-aand-loptions for the same command--color: colors the output which onieng6makes all your directories blue and executable files green
If you would like to always have the colored output, run the following command which will add the line “alias ls="ls –color" to the end of a file called .bash_profile. You do not need to fully understand this yet.
echo alias ls=\"ls --color\" >> ~/.bash_profile
If you get a message resembling: -bash: (...) .bash_profile Permission denied
Run: chmod +w ~/.bash_profile to give yourself permission to write to the file.
cd - Going Places
You can change your working directory to a different directory using the cd command with the destination directory as an argument.
$ cd folder
$ pwd
/home/aname/folder
There are also built-in symbols which refer to locations in the filesystem that you can use as arguments to commands.
/(slash) represents the root directory, which is the top-most directory in a file system. It has to start somewhere!~(tilde) represents the home directory, which is usually a specific directory assigned to each user on a system..represents the current directory...represents the parent directory, i.e. the directory in which this directory is contained.
mv - Moving Things
You can move your files with mv.
We have a misspelt file in the wrong location.
$ ls -R
.:
cse29  hellowrold.c

./cse29:
$ mv hellowrold.c cse29/helloworld.c
$ ls -R
.:
cse29

./cse29:
helloworld.c
Moved the file hellowrold.c into the cse29 directory and fixed it’s name. You can rename files, change their location, or both at once as shown.
cp - Copying Things
You can copy files with cp.
$ ls
alloc_basic.c
$ cp alloc_basic.c mytest.c
$ ls
alloc_basic.c mytest.c
Works exactly the same as mv except doesn’t remove the original file.
Good for when you want to make a variation of a file or have a backup.
scp - Securely Copying Things
you can securely copy your files with scp. Assume I start on my machine which is windows – not ieng6
$ ls
fruits.txt
$ scp .\fruits.txt etomson@ieng6.ucsd.edu:~/
fruits.txt                                100%   31     0.0KB/s   00:00
PS C:\Users\etomson> ssh etomson@ieng6.ucsd.edu
$ ls
Downloads    Music      pokemon.sh    cse29fa24
cse29su25    cse8a      ece148        MailArchive
fruits.txt   cse29      cse29sp24     cse29wi26
Documents   juotes.sh   quotes.sh
The file fruits.txt was copied into my home directory on ieng6.
A general format for copying to ieng6 is:
scp <file you wish to copy> <username>@ieng6.ucsd.edu:<path on ieng6 to put it>
username is the same as you used for ssh.
touch - Creating Things
The touch command is used to change the last modified date of a file (hence, touching the file). A neat bonus feature of touch is that it will create a file with the given name if the file doesn’t already exist.
$ touch random.txt
$ ls
random.txt
A quick side note - by default, the output of a command is printed out to the screen. But we can redirect the output into files using the > character. For example, $ pwd > random.txt takes the output from pwd and redirects it into a new file called random.txt (thus it does not print to the terminal).
cat - Looking at Things
You can use the cat command to display the contents of a file. This command is designed to be used to concatenate files, but it is also commonly used to print out things.
$ cat mylocation.txt
/home/aname/folder
mkdir - Creating Directories (Folders) to Hold Things
You can use the mkdir command to make a new directory with the given name as an argument.
$ mkdir nestedfolder
$ ls
nestedfolder
rm - Removing Things
When a file has outlived its usefulness, we may wish to remove them. This can be done with the rm command. For example:
$ ls
random.txt
$ rm random.txt
$ ls
Because the random.txt file got removed, our working directory is now empty, so ls doesn’t print anything.
man - Getting Help
Recall the command line options introduced for ls, -a and -l.
What if we wanted to learn more about what they do? What if we wanted to learn what other options ls has? How about the functionality and options of other commands? If only there were a manual for this information…
Luckily for us, there is. You can use the man command to look up the functionality of a command. For example:
$ man ls
LS(1)                                               User Commands                                               LS(1)
NAME
        ls - list directory contents

SYNOPSIS
        ls [OPTION]... [FILE]...

DESCRIPTION
        List  information  about the FILEs (the current directory by default).
        Sort entries alphabetically if none of
        -cftuvSUX nor --sort is specified
...
    -a, --all   do not ignore entries starting with .
...
    -l    use a long listing format
...
To navigate the manual page, you can use the up and down arrow keys. To exit the manual, press q.
Try looking up some of the commands we’ve learned about so far in the manual. Who knows? You might learn something new.
Who are you? – Whiteboard Activity
Using the commands above, fill out the following whiteboard with your group!
Each group member should put their answer for each box.
A set of example answers have been given
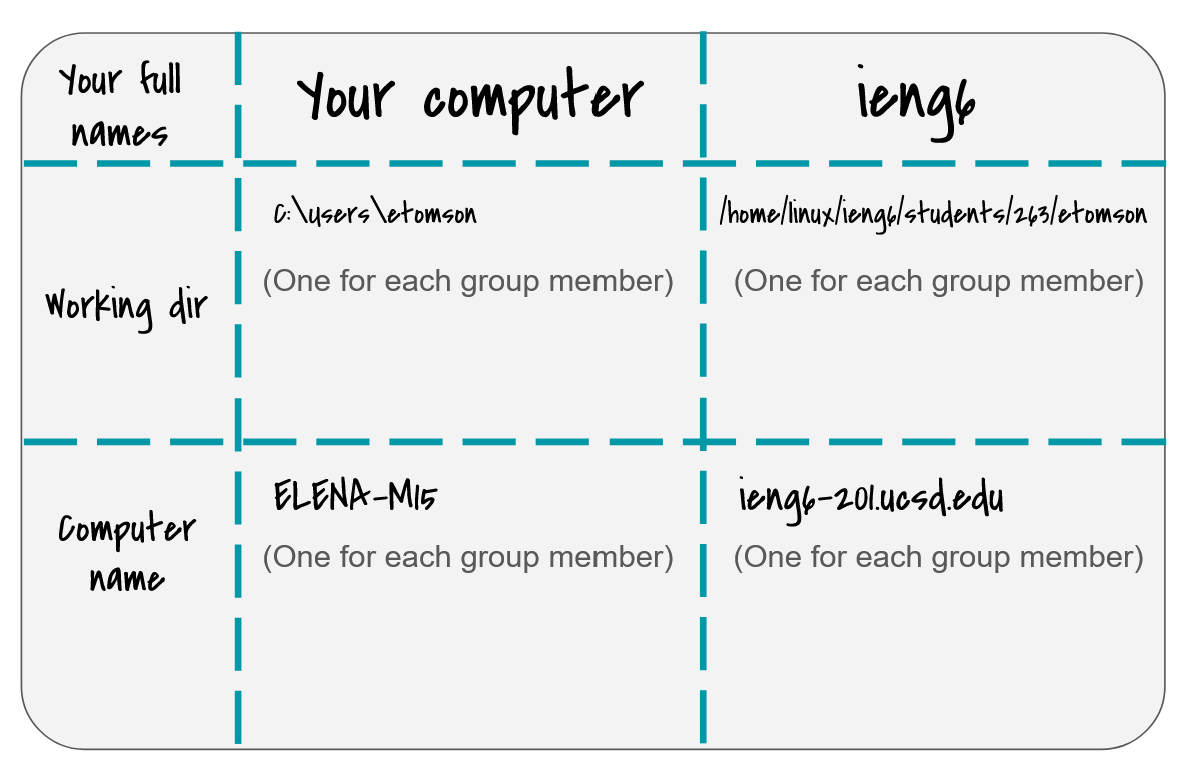
As a group, call over your tutor/TA to get checked off for your whiteboard.
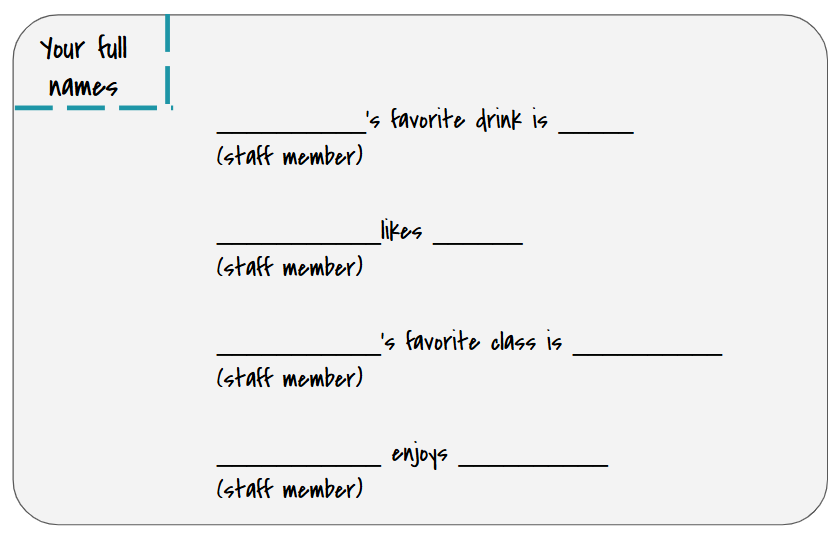
Who are we anyways? – Whiteboard Activity
Now that you’ve established who you are using some commands you just learned, the course staff has come together to make an activity for you to explore more commands from above and learn something about them.
Run:
- On ieng6, create a directory called
cse29, this will be the directory that contains all your work for labs - Within
cse29, create a directory calledlab1 - Within
lab1, Run:cp -r /home/linux/ieng6/CSE29_SP26_A00/public/people .
the . at the end is the path for your current directory. This will recursively copy the entire directory we’ve made called people into lab1 since that’s where you are.
Using commands from above, write down some information you find. Each person should contribute at least one thing they found to the whiteboard resulting in something like this
- Inside lab1, create two directories called Music and Books
In Music and Books, create a couple of files with the names of your favorite songs and books respectively, here’s an example:
 lab1
 |----Music
 |    |----Auld Lang Syne.mp3
 |    |----Canon in D.mp3
 |----Books
 |    |----OSTEP.txt
 |    |----Frankenstein.txt
 |    |----The Little Prince.txt
 |----people
      |--(...)
HINT: to pass in strings with spaces as arguments, surround them in quotes, for example:
$ touch "Auld Lang Syne.mp3"Navigate back to the lab1 directory, and use the
lscommand to print out the directories AND all their contents.HINT: there is an option that lets you do this, try using the
mancommand to find thelsoption that enables you to print the contents of a directory recursively
The Vim Text Editor
Back in my day, before we had IDEs, we had to write all our code in the terminal with Vim, and we liked it!
Up till now, you have most likely been programming in a graphical editor where you could click around with a mouse and highlight things by clicking and dragging.
But CSE 29 is cool. And using the mouse is decidedly uncool (in our view). So we are now going to learn a keyboard-based editor. Because you will spend the entire quarter inside the terminal (and you will love it), knowing how to use a text-based editor like what we are about to introduce is incredibly crucial.
After all, all the awesome hackers in movies are always typing, have you seen a single movie hacker clicking around with a mouse? Blurgh.
Our terminal-based editor is called vim. It’s an incredibly powerful editor once you learn how to use it properly. However, the learning curve is very steep, which is why the more you practice in these earlier weeks, the better. In this lab, you will use vim to write a small C program while learning a few essential vim features along the way.
to get acquainted with
vim, you can run$ vimtutorto open vimtutor which is a tutorial in and of itself. Please complete sections 1 and 2 of vimtutor. If you are a bit low on time, you can skip 2.3-2.5 and do them later. Don’t worry about memorizing everything as you go, you can always revisit it later and I have provided some of the same information throughout the last activity for your reference.
Vim is highly configurable—using its own scripting language (VimScript), we can customize its behavior in a wide variety of ways. We can even install a Vim package manager and add plugins that make it feel like VSCode! For now, let’s start with some sensible defaults, like 4 spaces for indentation, syntax highlighting enabled, and automatic “smart” indentation. If you haven’t configured Vim on ieng6 before, run the following command to download and install our configuration file:
$ curl https://cse29spring2026.github.io/assets/labs/lab1_commandline/vimrc.txt >> ~/.vimrc
Now, we are ready to begin. Inside the lab1 directory you created in the previous section, run the following command to edit a new file named contains.c:
$ vim contains.c
The Insert mode: “Just type”
When you enter vim, you start in the Normal mode. Press i to enter Insert mode, where anything you type gets inserted into the file. You should see -- INSERT -- show up at the bottom left (the status bar).
In this mode, you can:
- Use your arrow keys to move your cursor around the file
- Press Backspace/delete to delete the character at the cursor, much like conventional text editors
- Press Ctrl+Shift+V (Windows and Linux) or Command+V (macOS) to paste text from your operating system clipboard
- Press Esc to exit Insert mode and return to Normal mode
While we’re in Insert mode, let’s write a small C program that demonstrates a linear search algorithm. Complete the following skeleton in vim:
#include <stdio.h>

int contains(int item, int arr[], int size) {
   // Write your solution here!
   // Return 1 if "item" exists in "arr" (which has length "size"), otherwise 0
}

int main() {
   int arr[] = {2, 9, 2, 0, 2, 5};

   // Call "contains" with an item of your choice, "arr", and the length of "arr".
   // Replace "0" in the following line with your function call
   printf("Result: %d\n", 0);
   return 0;
}
The Normal mode
Press Esc to exit Insert mode. The -- INSERT -- indicator at the bottom left should disappear. You are now in Normal mode, where you can:
- Press
h,j,k, andlto move your cursor inside the text editor^ k Hint: The h key is at the left and moves left. < h l > The l key is at the right and moves right. j The j key looks like a down arrow. vYou can still use your arrow keys instead if you’d like! Psssst, no shame in doing so—professor Soosairaj does this, too!
- Press
:to enter Command mode - Press
iorato enter Insert mode- Try out both to figure out the difference!
- Copy/paste: press
ytwice to “yank” (copy) the current line into vim’s internal clipboard. Presspto paste it at the current cursor position. - Delete: press
dtwice to delete the current line and put it into vim’s internal clipboard. Presspto paste the deleted line at the current cursor position.
The Command mode
When you enter Command mode by pressing : in Normal mode, your cursor moves to the bottom line of the terminal, where you can type out commands. For now, we will only use two command shorthands: w for writing your changes (like pressing Save in a graphical text editor), and q for quitting vim. You can type :w to save your changes to storage, :q to quit (add ! afterward to force quit without saving unsaved changes), or wq to save and quit. So, when you are done editing in vim, you would type :wq from Normal mode. Pretty convenient, right?
By the way, if you ever change your mind and want to abandon your command, press Esc in Command mode to return to Normal mode.
A quick side note - avoid running two instances of Vim on the same file at the same time as this can lead to swap file conflicts. You should not close your terminal window to exit Vim as this will leave the swapfile there.
- Using
yyandpin Normal mode, change your code to make several calls tocontainswith different values foritem, printing out the result each time.- Using
ddin Normal mode, remove the line withreturn 0;inside themainfunction. This line is actually not required for themainfunction.- Save your changes and exit vim.
- To verify that your changes are saved, display the contents of
contains.cwithout using vim.
Vim has many more commands and shortcuts. You can complete more of vimtutor on your own time for a guided tutorial through them.
Compiling and running your program
Now we want to be able to run our program. First we will compile it using gcc, and then we will run our executable file.
Compiling
GCC, our C compiler of choice, takes .c files and compiles them into our executable. for now we will only have 1 .c file and we will give it as our first argument to gcc, giving us:
$ gcc contains.c (Don’t run this yet!)
However, this would create an executable named a.out and we would like our file to be named contains. (Yes, executable files don’t have an extension in Unix/Linux.) We can use the -o flag to do this. -o takes the next argument and renames the output file to be that name:
$ gcc contains.c -o contains (Don’t run this yet!)
We would also like to see any warnings that the compiler catches even if it doesn’t prevent it from compiling as an error. We will use the -Wall flag, which stands for Warn all. (Run this!)
$ gcc contains.c -o contains -Wall
If you don’t see any output from this command, then it has succeeded. To run our program, since it is named “contains”, we shall type:
$ ./contains
You should see your linear search implementation in action.
Congratulations! In this lab, you have created, compiled, and executed a C program. If your program has not run, please ask a staff member near you for help.